Pages

Sunday, November 13, 2011

Christmas Gift Bag Tutorial


Hello my friends, hope you are all well.
Christmas is fast approaching and I so enjoy making things for this holiday. 
I thought of making these sweet little gifts bags and paper ornaments, and after I had finished the first I decided to take photos for a tutorial, but first a few finished pictures :)

 The Ginger is made from a scrap of brown kraft wrapping paper. Same for the start and I also made a heart. Punch tiny holes and add a hanger for your tree.
It's easier if you draw your design on the doubled paper first, then stitch around it before cutting it out. As I was sewing them on the machine, I poked in a little stuffing so they are not so flat. You don't need much.
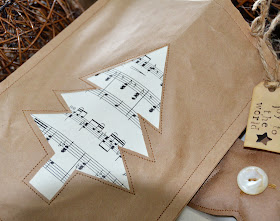
This is the paper bag I used to cut out
my first tree. I just lined it with sheet music.


I hope you enjoy this tutorial, it's been ages since I made one. You can make these bags with regular paper of any kind really, just be creative and make it your own. Enjoy.....

This is what you will need to get started.
Paper bags X 2 if they are flimsy like mine.
Paper bag x 1 to cut out Christmas Tree.
Old book paper
Sheet music
Burlap or Cheesecloth or other
Twine for handles
Buttons and embroidery floss
Thread and glue gun

The paper bags I used are not lunch bags, they are from a gift
shop and much lighter.
so I had to double up and in using old book paper as a lining
 it makes them nice and strong.
I first cut the edges so they were even, but his step is up to you.

Lets get started :)
This tutorial shows me using cheesecloth which is laid down
first on one paper bag. This will be the front.
Add some sheet music that has been torn on the edges.
Now stitch around the sheet music in a random line.
You don't have to be perfect. I go in a curvy line.

Cut a Christmas Tree shape or other shape from another
 paper bag.
Now, it's back over to the machine to sew it on.


Cut your twine or whatever you have for handle into two pieces.
Can you see how I have placed them inside the bag?
It's about an inch in on each side.
Now you are going to sew along the top of the paper bag
and seal in the twine for hanging or carrying the bag.
One straight line across the top.

Cut your old book paper to fit the size of your paper bags.
Now sew it along the top edge of bag on both paper bags.
On the inside. This is going to make a lining.
When you have done this you are ready to stitch
the two pieces together.

We are almost done :)
I used some wooden buttons which I had dyed with coffee.
Using some embroidery floss I made stitched
through the buttons so it looks as if they are
attached this way. You could stitch through the paper
but I decided to glue mine on with the glue gun.

Your inside will have old book paper, or whatever
you choose to use. I think it gives it a nice finish, it
just seems to add some strength too.


Now you have some sweet little gift bags for that
special small gift :)
I made some little paper ornaments too using brown kraft
wrapping paper, they will be nice to pop in the bag.


Happy Kindness Day to you all,

Lynn